categories: |


favorites:
Faux-Antique frame with vintage silver display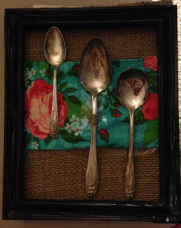
I have recently been looking for a fun way to display my grandmother's vintage silver-plated flatware (Roger's Bros. 1847 in Dafodil). I love the way this vintage-esque floral print looks against the neutral burlap, and since I had some extra lying around, I decided to decorate a cheap frame and display a few silver pieces on my wall for decoration. Maybe someday I'll get around to polishing the rest of it and then I can actually use some of it! Until then, check out this quick tutorial to make your own antiqued silver display. |
The couch cover project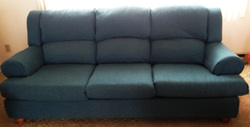
I was inspired to re-upholster a used couch that was donated to us by a friend... I couldn't stand the visible wooden frame and fraying cushions, but hate using slip covers, which need to be constantly adjusted. So I did a sort of faux-upholstery project, and using only hand-stitching and my trusty staple gun, completely recovered this lovely couch.
|
A plethora of paper flowers!
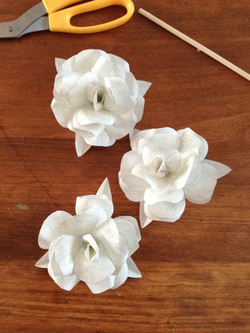
I have been browsing lately, looking for a good tutorial for paper flowers. I see them everywhere and love them always. They are excellent on top of a simply wrapped package, beautiful paired on long stems in a vase, and elegant on a wreath. They dazzel in brilliant bright colors and understated ivories, with script or type-face telling secret messages, they can be tailored to interests--being made out of maps, or favorite photos. Best of all, they are easy peasy to make. I made these (pictured left) using a very nice template from Ellinee.com but they can be made without a template, easily enough. Sketch (if you're the type) a "flower" shape, think simple to start, onto regular weighted printer paper. (I recommend cutting many at once to save time) If you cut several "petal" layers of slightly different sizes, they layer quite nicely. Once you have your shapes cut, you can fold them into little cones, or cups, which will be nestled like Russian dolls. Folding allows you to see the shape of your petals before you secure them, thereby trimming any excess etc. I think it looks very nice to curl the sides of the individual petals in each layer, to give the effect of an opening flower. This can be done pretty easily using scissors--as long as you are careful not to shred your petals in the process (after doing this several times, I discovered that the rips can be rather easily repaired using hot glue). Once you have the petal layers curled, secure the cup shape with hot glue (be careful, or maybe buy the low temperature hot glue to spare your fingers...paper is very thin). After you've glued all of your petal layers, stack them to visualize the end effect, make any edits to the design now before securing the layers. To make the center of the flower, cut out the shape of a single petal, you can make several of these to change the way the center of the flower looks. Curl the rounded edges of the petal to add dimension and roll it into a tube shape (you can use a pencil, or bamboo stick as a way to hold the shape). Glue the tube closed. If desired, additional single petals can be glued to the center piece. I suggest trying to glue the inside petals in a spiral, so that it looks like the flower has simply spiraled from the center. Once you are happy with the center of your flower, secure all layers together with hot-glue and ta dah!
Featured craft: Pinot's Pallet, paint-by-instruction

Some girlfriends and I recently went to Pinot's Pallet, in Fort Collins, and attended a paint-by-instruction party. Believe me, this was an amazing way to spend a few bucks and have great fun with some good friends, or if you do not have a place like this in your area, buy some supplies at Michael's, grab your friends and host your own painting party---was seriously so much fun!
